WELCOME!

It is hard to believe that it was almost ten years ago I witnessed a CNC router in action for the very first time. I was fascinated and simply had to have one! Although I had been in the creative end of the three dimensional sign business for most of my life I didn't really know what I would do with one of these machines - but I just knew it could do fantastic stuff.

Along with the CNC router I discovered the wonderful material called Precision Board and the glues, primers and other companion products they offer. Since then we have gone through many tons of the material using it in most signs and projects we tackle. This journal will chronicle our many adventures both past, present and future. I'll talk from the perspective of someone who pushes these products to the creative limit on a daily basis. I'll be adding to the stories two or three times each week. -dan

Friday, June 23, 2017

Another award

The sign collection for the Pin & Crown Pub were honoured once again. This time it was a first place award in the Signs System category of the Sign Media - Canada.


Another award!

The sign collection for the Pin & Crown Pub were honoured once again. This time it was a first place award in the Signs System category of the Sign Media - Canada.


Wednesday, June 21, 2017

Another load gone

With everything ready to go prior to the fifty-three foot trailer arrived we had a whole day to load it. This meant we could do the task without rushing. The pallets were numbered and one by one we carefully brought them to the truck and slid them into position. Since we don't have a loading dock we instead used the forklift along with a custom designed, two piece push rig that fits onto the forks. We can reach into a trailer about thirty feet. The pallets each weighed up to two thousand pounds but slid easily on the smooth trailer floor.

Each pallet was equipped with temporary dolly wheels which facilitate easy movement of the heavy pieces around the shop as we build. As we lifted the pallets with the forklift these wheels dropped off effortlessly, ready for reuse on the next project.

With all of the pieces stuffed into the trailer securely there was only four inches of space left by the door. Some scrap dunnage was tossed into this space to prevent any movement on the journey.

The total time to load was just over three hours. Tomorrow morning we sent the trailer on it's way.


Monday, June 19, 2017

Packing for the trip

We think carefully about how we will move our pieces in the shop as we build them. They need to be safely lifted into the transport truck and secure while they are being transported. Once on site our customer needs to easily and safely move them once more, lift them into place and secure them in place permanently. It is easy to say but requires lots of thought and engineering to pull off. 

The planning starts as we design the pieces with lifting and mounting points built in from the start. The combined weight of the pieces for this shipment is about fifteen thousand pounds.

Tomorrow the trucking company will drop off a fifty-three foot long trailer for us to load. It will leave on Thursday morning. Today we shifted our efforts from production to packing. The pub signs we finished late last year were cut off their temporary stands and welded onto a new custom designed steel pallet. Underneath the signs four post backs will rest. These heavy pieces will provide ballast weight to keep the top heavy signs in place.

The pieces are fabricated from a variety of materials including, steel, plywood, concrete, sculpting epoxy and 30 lb Precision Board. Each piece has hard points built into the piece for lifting, carrying during transport and final mounting.

The pallet holds the six pub signs as well as four post backs which go on sideways, in pairs on each end of the pallet.


The massive (and heavy) posts sit on a structure that mimics the six by six steel posts they will surround when they are mounted. In the background two arches are mounted back to back and at a slight angle for safe moving and transport. Ten of these arches will fit on this load.

Sunday, June 18, 2017

Telling a story with paint

Yesterday I mounted the dynamo armature to the largest gear on the 'MARVELOUS MACHINE'. I then designed and cut a bracket to mount the outer housing. I painted and aged the pieces prior to assembly. It was pure magic to watch it all turn.


It was looking pretty good but I wasn't finished quite yet. I knew a few minutes with a brush would change things in a big way.


I first painted two coats of metallic gold on the raised areas of the name plate. When this as dry I added a little aging to tone it down. I then came back with a brighter metallic gold and added a little bling to the areas what would naturally wear with use.

I then  added a little rust to the base on the right side. This was dirtied up with some dark glaze. Then I brought out some dark metallic silver and dry brushed the edges of the rotor and also the top edges of the base. This was followed up with the teeniest amount of bright silver on the edges to add a little wear and bling to those areas. Once again I aged things back down a smidge before I called it done.

The piece instantly had a history and looked like it had been in service for many decades. It looked well used but cared for and maintained.


Thursday, June 15, 2017

Hands-on learning

I've known Julio Pierre for ten years, and had the chance to visit with him at sign trade shows through that time. Julio works for MultiCam as an application specialist. He does demonstrations of the various machines which MultiCam builds. Through the last ten years Julio has answered my countless questions as I sought to learn more about MultiCam CNC machines. Each time I see him he has expressed his desire to visit our shop. At last that time has come.

He is visiting for three days and in that time he wanted to see first hand all we do. We could of course do much better than that. We are giving him a chance to try his hand at doing all the various tasks that go into the magic we create.

He is already a master at the CNC machines and the programming so we didn't need to spend time on that but we still had lots of ground to cover. Before he came we had routed some samples which he would paint. Becke did that teaching.


In between coats of paint he worked with me to do some sculpting with epoxy. We worked on my 'MARVELOUS MACHINE' which will make it's debut in the MultiCam booth at the International Sign Association EXPO in Orlando next year.


Today, it was time to do a small concrete sculpture. Julio welded for the first time, then tackled the prickly job of attaching the expanded steel lath to his armature.


I suspect he has handled a trowel previously for he had no trouble with the job of applying the concrete.


Then, after the concrete has set for a while it was time to do a little carving. Julio it seems is a natural at just about everything we throw at him.


We have one more day in the shop to try a few more things.

Tuesday, June 13, 2017

Another name plaque

With the arrival of a guest in our shop tomorrow it was time to create a name plaque. Julio wants to learn how we do our finishing and there's no better way than doing it hands on! In order to demonstrate our techniques we needed a second name plaque as well, so Grant (my soon to be son-in-law) is getting a name plaque as well. Both plaques are to be identical save for the name.

I started by building the vectors for the plaque components


I then selected the plaque outline and created a flat relief. 0.45" tall.


I then imported a sandblasted woodgrain bitmap which I sized to fit on the board. I applied it with a value of 0.2" tall.


The metal bands were next, created as flat reliefs.


I imported a second bitmap to add some texture to this band. I input a value of 0.1" for this procedure.


Then I modified these two reliefs by using the add to tool. This created the flat washers.


The bolt heads were next and I used a value of 0.3" tall.


I then selected the metal band reliefs and the board relief and combined them into one relief.


The lettering outlines were next, also created as individual reliefs. Note I did both names at once to save time.


The lettering outline reliefs were then modified by adding the lettering - also a flat relief.


I then duplicated the wood relief and positioned the second name appropriately onto it. The last step was join the letters by merging highest with the wood plaque base relief. The two plaques were done separately.


I could then tool path the two plaques and send them to the router. They were routed from a piece of 1.5" thick 30 lb Precision Board.

Sunday, June 11, 2017

Dimensional samples

One of the most striking thing anyone will notice as they walk into our shop and studio is the many dimensional samples hanging on the walls. There are more than one hundred and fifty in all (so far). It's obvious that we have invested a great deal of time and effort to create them. Why would we make such an effort?

There are many answers to this question. I would have to say they were fun to make and this was indeed a motivator and reason. But it goes way beyond that. These samples were a way to test new materials and methods, to practice our craft. As we built these samples there were no constraints and often no the limit, unlike most customer's paying projects. Sometimes we do samples to solve a problem or to create a tool to sell a project to a customer.

Our samples allow us to up sell in a big way. If I describe something to a customer, what they see in their mind's eye is based on their experience. That is not what I wish to sell them. If I can physically show them what I have in mind it is most often far more than they imagined... and more expensive too. Allowing a customer to see and touch a sample is far more effective than anything I might say.

In short I attribute our samples for a great deal of our success. They are a very sound investment!

Saturday, June 10, 2017

Dynamo

As I thought about what my 'MARVELOUS MACHINE' would do I decided the steam engine would power an electric generator which would in turn power the next device. With a little research I discovered they were called a DYNAMO when they were invented. On further research I found a photo of one I liked.


I did a sketch to visualize how it would fit on a heavy duty bracket and have a gear to drive it. Then it was time to guild the routing files.


As with every project the first step is to take a good look at what we are building. I then break it into sub components and design the files and pieces separately. The centre vector was built by using rectangles and using the jigsaw tool 


I then drew up some rectangles which would be used to create the motor housing pieces. These were centered. The point edit tool was used bend in the sides and the jigsaw tool was used to cut them out.


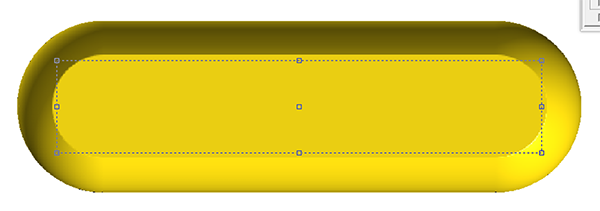
I created the other pill shaped vectors for the top and bottom pieces as well as the side magnets.


To crete the magnet cylinders I first used the dome tool to create a relief.


I then created a zero height relief of the shape and size I wanted the final relief.


I then merged the two reliefs by selecting the rectangle relief first and then merging (highest).


For the top I used the dome tool but selected the limit to height. I randomly picked 1.2" in height and


I selected the plaque and lit up the render of the relief. It showed me how it would fit on top of the curve.

It was time to build the plaque which would be mounted to the top. I created the half inch relief.


I then selected the base relief, the inner oval and the lettering and sunk them into the relief  using the subtract from command.


I then duplicated the pieces I needed which made everything ready for tool pathing.