WELCOME!

It is hard to believe that it was almost ten years ago I witnessed a CNC router in action for the very first time. I was fascinated and simply had to have one! Although I had been in the creative end of the three dimensional sign business for most of my life I didn't really know what I would do with one of these machines - but I just knew it could do fantastic stuff.

Along with the CNC router I discovered the wonderful material called Precision Board and the glues, primers and other companion products they offer. Since then we have gone through many tons of the material using it in most signs and projects we tackle. This journal will chronicle our many adventures both past, present and future. I'll talk from the perspective of someone who pushes these products to the creative limit on a daily basis. I'll be adding to the stories two or three times each week. -dan

Tuesday, March 28, 2017

Sculpting a wonderfully complicated tree

When I last left off the tree armature was still in the welding stage. Once that was complete the crew hand tied the galvanized diamond lath to the structure. They rediscovered what we have long known to be true. The more detailed the armature, the more difficult it is to tie on the wire, and the longer it takes. But all those twisted roots and branches are well worth the effort!


Once the wiring was complete it was time to begin applying the fibreglass-reinforced-concrete and then sculpt in the detail. The tree was large and complex which meant we had to do the job over three days. The first day we sculpted the bare wood (without bark) on the upper branches.


The second day we did the bare wood on the lower areas of the tree. This included some very detailed knots and roots.


On the third day we first applied a bonding agent where the bark would overlap the previous day's sculpted concrete. We then laid on the bark layer of the rest of the tree.


Today Jenessa used sculpting epoxy to form the rope over the structural steel rod which helps hold up the routed Precision Board sign. The sculpted some giant knots into the sculpt to make it believable. There is still a little sculpting to be done on the mechanical bug who is holding up the the other end of the banner but it won't be long until we are into paint. Stay tuned...

Tuesday, March 21, 2017

Delivery day at the PNE

You can't imagine the fun and excitement of one of our deliveries until you experience it first hand.

The latest began bright and early with a big crane pulling into our yard, followed by a semi truck and trailer. After a quick safety meeting to talk about the logistics of the move it is time to get to work. Each heavy feature is safely and securely hooked to the giant crane and then lifted into place. Careful attention is paid to safety as one of these pieces could easily hurt someone badly (or worse) if something failed.


Once everything is loaded the hold down straps are put in place and cinched tight. Everything is checked multiple times. For today's load we had to get an overweight permit and a special route was selected to ensure every overpass along the sixty mile journey was cleared with room to spare.


Peter and I rode in the chase vehicle keeping an eye on the load and straps as we travelled. It was a little like being in a parade as people took notice of the brightly coloured load as we rolled by. There were plenty of second looks, stares, waves and smiles along the route.


We kept in touch with our client as we travelled so they could coordinate their crews and heavy machinery for our arrival. When we arrived we again held another meeting to plan the unloading process and safety procedures. Then it was time to hook up the first piece and swing it into position. Everything had been carefully marked out in advance. The stump with the drum on top was the first.


Then the truck and crane were relocated across the property for the second phase of the unloading process.


The Flutterbye tree also was carefully positioned on it's predetermined marks.


The last crowning touch was the colourful Flutterbye which seemed to fly into it's place by magic. In the space of a few hours the first of two deliveries for this project was complete.


Saturday, March 18, 2017

Bright coloured fun!

With the first delivery day imminent we worked hard to meet the deadline. The powder coater delivered all of the colourful parts with only hours to spare. We bolted the bright plasma cut flutterbyes onto the fence panels.


Inside the shop the tree sculpture is done.  little more welding was done to the temporary carrier frame to ready it to be fastened to the truck. It will soon be rolled out onto the parking lot in readiness.


The sculpting and painting of the fluttery body was the last thing to get crossed off the list but it too is ready to go. The truck and crane arrive early on Monday morning. It will be fun to watch this load go down the highway as we travel the sixty miles into the city to supervise the installation the same day.


Friday, March 10, 2017

Bug Whirled feature - sign

We are making great progress on the large Bug Whirled sign. In the last couple of days we finished painting the giant base of the sign. We pushed it out of the shop to make room for other pieces. 


One of those pieces was the next layer (layer two of three) of the feature. Today was the day we would sculpt the globe to look like it was made from wood. It took the entire crew to accomplish the task but it turned out very nice!


Wednesday, March 8, 2017

Hanging the 'banner' sign

I set the router into motion as we left the shop at quitting time. I went out twice to check in the evening and the file finished running about 11:00 pm. I was delighted with what I saw and found hardly wait until morning to put it together.


This morning I routed some slots in the corner to accept some 3/8" rod which will act as the rope which will 'hang' the sign from the corners. In actual fact the sign will be suspended from the two pieces of tubing which stick out of the back. The rest of the frame dropped into the routed slots in the middle. This makes the sign well able to handle anything it might be subjected to in the theme park environment. The back and front of the sign were then laminated together with the steel frame in the middle. 


We then lifted the sign into position and permanently welded it there. I was pleased with the result. We will now finish welding up the armature of the tree and get to the sculpting process. Stay tuned...


Tuesday, March 7, 2017

Creating a faux hung banner


I love new and original challenges when we make a sign. Generally as I design the concept drawing I have a vague idea of how we are going to build it - just enough to not lose any sleep. The actual figuring out of how we will accomplish this is left until we begin work and not a minute before. That's what makes my work so much fun!

For this project we started with a client's design for a new ride in a theme park. Most often we insist on creating our own artwork but this was fun and quirky enough to go ahead as is - save for some color switches.  The vectors were ready to go minus the drop shadow on the lettering and white highlights on the dots. To get rid of those we just had to delete those vectors.


The client wants a fun but natural looking theme. We went with mechanical bugs and added some gnarly trees. I wanted the sign to look like a cloth banner, but it needed to be tough and look good for decades. I also wanted the letters to be dimensional. That meant we would route the sign from 30 lb Precision Board and imbed a steel frame in the middle for strength. Somewhere in it's lifetime someone is bound to do some chin-ups or climb up for a selfie. It's always better to be safe than sorry.


I imported the lettering and quickly drew up a banner shape. Notice the lettering although plenty fun does not droop like the banner.

Luckily the latest version of EnRoute has a handy dandy warp tool (transform) to do the warping for me. I selected it and then opened the warp took. It is a simple matter of grabbing the handles and adjusting things until I was happy. 


Then hit enter to see what the final result looked like. I was happy! I added a couple more nodes and adjusted the corners of the banner.


I duplicated the banner and created a cutout for the structural steel which would be laminated inside. As a last step I created an outline around the letters using the offset tool.


I wanted the fabric of the banner to wrinkle up a bit to look like it was being suspended by the top corners. To do this I opened a screen shot of the banner outline in Photoshop and then created a quick bitmap. As always I thought about how the bitmap would work inside EnRoute. White raised - black does nothing and greys react somewhere in between - depending on their value. I knew a blended bitmap should work pretty good.


Once I had the bitmap in hand I created a flat relief in EnRoute. 


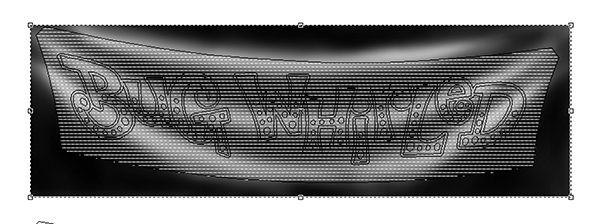
I then imported the bitmap and located it over my relief. I assigned a value of .75". This meant the white areas of my bitmap would raise that location by .75" and the black would do nothing.  I hit enter and then the render button to see it my plan worked...


It worked perfectly!


I then modified this relief by raising the area around the letters.


I modified the relief two more times with the lettering and dot vectors. Everything perfectly followed the contours of the folded banner. I love it when a plan comes together! :) I can hardly wait to see it routed!


Friday, March 3, 2017

Sculpted detail

We love our MultiCam CNC plasma cutter and router without a doubt but we believe the true magic happens when we combine the work we do on the machines with hand work as well. If we can make the pieces blend in such a fashion that no one can tell how it was produced then that is the most magic of all!

All of the pieces were assembled in the last few days. We spent a full day at the laborious task of hand-tying on the galvanized lath. It has to be done just right to make the next step work properly. That is to trowel on a thick coat of fibreglass reinforced concrete. As it begins to set we carve in the detail by hand. We have to work quickly while paying attention to every detail. Once the concrete sets there is no going back to fix things.

The operator's booth/sign feature is immense and tricky to get a picture of against the shop lights. Today we sculpted about 3/4 of the feature surface, leaving only the heavy bark areas to do on Monday.


The Flutterbye now perches perfectly on the branch. With the concrete completed in this area he and the leaves will be sent off to the powder coaters on Monday.


The show side of the feature is beside where guests will line up for the ride. We spent extra time sculpting in the superb detail of the woodgrain in this area.


There is plenty of room for the operator and controls inside. The measurements of this space was set by the manufacturer of the ride.


Here's a closeup of a sculpted knot. It's hard to believe it is concrete! Paint will make it look even better!