WELCOME!

It is hard to believe that it was almost ten years ago I witnessed a CNC router in action for the very first time. I was fascinated and simply had to have one! Although I had been in the creative end of the three dimensional sign business for most of my life I didn't really know what I would do with one of these machines - but I just knew it could do fantastic stuff.

Along with the CNC router I discovered the wonderful material called Precision Board and the glues, primers and other companion products they offer. Since then we have gone through many tons of the material using it in most signs and projects we tackle. This journal will chronicle our many adventures both past, present and future. I'll talk from the perspective of someone who pushes these products to the creative limit on a daily basis. I'll be adding to the stories two or three times each week. -dan

Friday, July 31, 2015

Baliee name tag

Bailee's name tage was the next one up, fairly simple but with a couple tricky moves to make it better. As always we started with the vectors.


The oval name plaque has a border that will be plain and so the first relief we create was done using the doming tool. Everything would be built off of that.


Then I modified this relief by raising the venter portion.


Then I rased the lettering border by selecting both the base relief and the lettering border vector.


Then it was time to add the texture. I imported the wiggly line texture from my TEXTURE MAGIC COLLECTION. I enlarged it enough that a 1/8" balloons bit would cleanly route it. Then I carefully entered it on the plaque. Then I selected the base relief, the inside oval and the lettering outline. This controlled where the texture would go.


The last step was to create the bevelled lettering using the prismatic tool.


Then it was time to tool path the piece and send it off to the MultiCam to be routed from 30 lb Precision Board.

Wednesday, July 29, 2015

Revisiting Cap-it

A little more than four years ago I built some fun displays for a local company called Cap-it. The stands were used too hold their catalogues near the entrance to their stores. The step by step is posted here...   Cap-it trucks posts


Now they are launching a new advertising campaign featuring a British bulldog mascot. And so I got the call for a new display. This time we are only fabricating the top portion of the display.  The beauty of EnRoute and our MultiCam is that I didn't have to build a new file for the sign portion of the display. I simply searched back through my archives and dug up the old one. It had to be resized slightly and then it was ready to go. Once routed it was a simple matter to sculpt the bulky dog behind it. That process took less than a day using Abracadabra Sculpt and my trust helper Sarah mixing for me.


Today we began the painting process and the dog instantly began to come to life.

Sunday, July 26, 2015

NANCY name plaque

As always it started with a quick rough sketch.


I decided that some rivets in the corners would be cool.


To make the type look old I used the transform tool to add jitter to the lettering. Then I added a border.


I changed my mind once I took a second look and decided on washes with bolts instead in the corners.


Then it was done to work creating the reliefs starting with the base relief.


I then selected the inside border and the lettering border to modify the original relief by subtracting from it.


Then it was time for some subtle texture over the entire relief.


Then a second lecture bitmap was applied to just the sunken background.


Then I modified the relief by adding the washers and bolts as simple flat additions.


Lastly was the raised lettering using the dome tool.


BOB name plaque

Bob's name plaque was the first out of the gate. I started with a quick hand drawing to work out the basics.


 The first task in EnRoute was to work out the vectors.


I started with a flat relief. This would form the border and everything would build off of that.


I then modified this relief using the dome tool.


I decided to add a border on the lettering before we went too far.


I then used this lettering border vector to modify the relief.


I then selected the relief, the inside round, the lettering border and the lettering and the texture bitmap. I applied a value of .2".  


I then modified the relief using the lettering vector to raise the letters from the border.


The last step was the centre dome. It was created as a separate relief.


The height of the relief wasn't important at this stage. I then went to the front view and using the up arrows raised it into position.


Once it was lined up I then merged it highest with the base relief.


Once merged with the base relief I aligned it to the bottom of the plate and took a look at it in the front view. I build without a great deal of concern about the height of the final relief as it is a simple matter to grab the top node and then pull it down into the plate.


Then it was time to tool path the relief and send it off to the multiCam. The first (rough) pass was done using a 3/8" ball nose bit and a 50% overlap. The finish pass was done using a 1/8" ball nose bit and an 80% bit.


Friday, July 24, 2015

Scribbling down ideas

With the next Sculpture Magic Workshop now less than two and a half months away it is time to begin preparations. We start with the name plaques as they make great filler projects. I began tonight, scribbling ideas in my sketchbook while I watched the superman movie. I managed to nail down eleven concepts. Not all are complete but once I get this far the rest comes easy.

We do name plaques for each attendee for a number of reasons. It is a chance to stretch my mind in a hurry as I create more than a score of unique name plaques. I also use a variety of techniques to design the routing files. That's good practice using EnRoute software. We use the plaques to practice our painting techniques and often try out new things. Designing, routing and painting the plaques helps us remember each attendees name as well. Most importantly it's one more thing that takes our workshops over the top as each attendee gets to take them home when the workshop is done.

With a name like Zuzana the background begged to be zebra stripes. You can bet this won't be black and white when it is done.


Nancy is a classic name and a typewriter font came to mind.


Bailee has attended our workshops previously. Young in years she is a very creative person!


Andy needed a playful lettering style. I have some cool ideas in mind for the background texture.


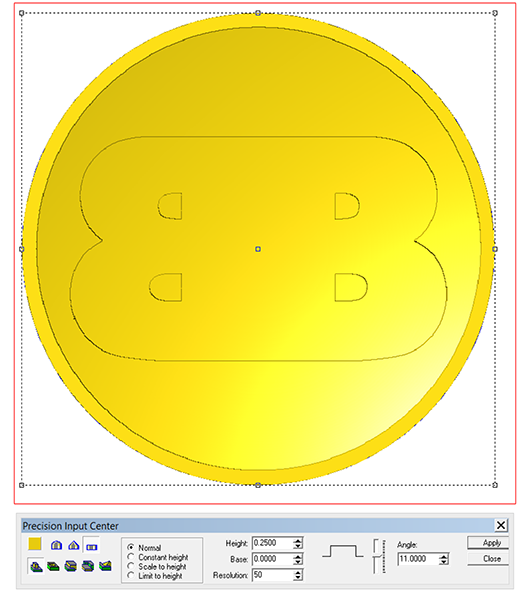
BOB is a fun name to play with. The 'B's begged to be back to back and the 'O' wanted to be nice and round like a ball. I'll bet the 'O' sees some gold leaf.


Caitlyn has also attended a workshop previously. This oriental style font seemed to call her name.


I'm not finished with Jeremy yet and this will still get some serious tweaking to make the idea I have in mind work.

Same goes for Kenna but I know exactly where we are going from here.


Steve will be all about the background texture to make it pop. This is going to be cool.


I'm now more than half way through the sketching of ideas. With eleven ideas now nailed it can get tricky to come up with even more creative name plaques.  But no worries for there have been more than two hundred and fifty unique name plaques created since we began our workshops.