WELCOME!

It is hard to believe that it was almost ten years ago I witnessed a CNC router in action for the very first time. I was fascinated and simply had to have one! Although I had been in the creative end of the three dimensional sign business for most of my life I didn't really know what I would do with one of these machines - but I just knew it could do fantastic stuff.

Along with the CNC router I discovered the wonderful material called Precision Board and the glues, primers and other companion products they offer. Since then we have gone through many tons of the material using it in most signs and projects we tackle. This journal will chronicle our many adventures both past, present and future. I'll talk from the perspective of someone who pushes these products to the creative limit on a daily basis. I'll be adding to the stories two or three times each week. -dan

Friday, December 30, 2011

We'll leave the lights on

There are few things that add more sparkle to a sign more than lights. With the advent of modern LED lighting it is now possible to include lighting in ways we could only dream of years ago. Now it is easy, safe and economical.

I found a new lighting system a couple of years ago that looked promising. It is called Heico Lighting  It was a while before I had a chance to try them. Late last year on the MultiCam office project was the first time MultiCam Sub I got a chance to really give them a test drive. I was impressed to say the least. After a year in operation they still are just as amazing and still work perfectly.

What is different about these little lights is how easy they are to install. No advance planning is necessary for they just slip over the low voltage wire without even connecting them. One small transformer can power 1-350 of the modules. A slightly larger model can handle more than double that number of lights.

We hear many guarantees these days promising the moon and more. Sadly it isn't always factual. This time I believe the claims to all be true.  Early in 2011 I had a chance to sit down for a long talk with some of the folks at Heico lighting. They are a small company in eastern Canada that actually makes their own products and doesn't merely have someone in China do it. They promise five years of trouble free operation and they back it up too. That is a very rare thing these days.

I couldn't resist adding some of these little lights to brighten the windows of the Rovers Return Inn sign. Peter and I picked up some white plexiglass today, cut it to size and popped the pieces into the window frames from the rear. Then we tested out a couple colors of the Heico lighting modules. We both agreed the amber added the perfect warm glow. Five modules would do the trick. Here's a shot of the back of the sign to show how things were laid out.


At the last minute I decided to add gold to the Rovers Return sign as in some of the reference photos it appeared that way. It added a little more bling to the piece. The glowing windows was the crowning touch. In the subdued light of the pub this sign is going to look stunning! One more piece of eye candy is now ready to hang at the Fox and Hounds Pub.


I'll be doing a step by step on some cool upcoming projects that are designed to take full advantage of this wonderful lighting technology in the next few weeks so watch for it...

-dan

Thursday, December 29, 2011

Marketing - seven year old style

Phoebe (my seven year old grand daughter) is big into 'owning and operating' a store these days. All through the holidays she has been busy producing copious amounts of drawings and other art and then selling them to relatives - especially her grampa. The proceeds she is donating to Pipsqueak Paddocks. (her idea). www.pipsqueakpaddocks.com   She has a table set up in the play room. The art is carefully laid out in an elaborate display. Paper signs she has designed and colored are taped to the walls. Hand drawn business cards (complete with her own logo) with all her information are handed out to those she meets to spread the word of her enterprise.
Since before Christmas she has been asking if I could please make her a real dimensional sign. I of course said yes but needed a design. Today she was helping in the shop and she went into the studio for a long time while I was busy. She came out with a design in hand - all excuses were gone.


Dragons seem to be Phoebe's current interest and so her sign features a nice one - holding a sign with her name on it. She explained the design at great length to me. It would be 24" wide and showed me how big that would be with her very own tape measure. The sky (background) would be blue. The sun would have to be yellow (like in all her drawings) The dragon would be colored as pictured. It needed hangers with real chains so it would be very strong. And I was not to worry about the details for she would help me as we got that far into the production of the sign. She also set a deadline. Could I please have the sign ready in 3 days?  I told her it would indeed be possible if she helped me.
With Phoebe looking carefully over my shoulder I painstakingly drew out the vector art I would need to do the routing file for her sign. She corrected me when I strayed too far from her original design.


Then I created the routing file which we'll put on the machine tomorrow. The file was pretty basic. To create a childlike sculpture of Phoebe's dragon I simply let the software determine the shape of the rounded body. The exception was the mouth which I formed by merging (lowest) a wedge shaped piece of zero height. The scales on the dragon's back were flat reliefs. All the reliefs were built separately , moved to the right height and then merged highest for form the 3D picture Phoebe was after.


Phoebe is very excited about finishing her very first sign! Stay tuned...

-grampa dan

Painting and glazing brings projects alive

Paint can make or break any design. And the glazes are the difference between a sign that looks plastic and new to one that has character, depth and age. The picture below shows how the Rovers Return sign looked when we finished the base colors. The building looked crisp and new, but also looked too flat. The brick lines were weak and didn't catch the light as they should.


For the glaze I added some clear base and a bit of water to make it flow, then slopped on a coat of the grungy, dark brown and then wiped it off judiciously with a soft towel. The building instantly came to life. Every crack. crevice and bit of texture suddenly became evident. The building looked like it had been there for a long, long time. I still have to add the lettering on the two small signs.


The plexiglass windows still have to be glued in and I'll be installing some LED lights to make it look like the building is occupied. Stay tuned...

-dan

Wednesday, December 28, 2011

Sculpting done on the Rovers Return sign

Today was organization day in the shop. My son Peter, who is on Christmas break from university gave me a hand. First we put away tools and supplies - all to their proper home. Then it was time to do a project I've been wanting to do for some time - The sculpting on the Rovers Return Pub sign. Peter is an accomplished artist in his own right. He worked as a team leader for us for more than 14 years. He handled the brickwork on the front of the tiny building while I handled the rest. We jockied positions, switching sides as necessary to get into the tight spaces. With two skilled hands at work the building was done in a short while. In this shot Peter is adding texture to the small bricks using an old toothbrush.


Tomorrow the final texturing of the base portion of the sign will be done using a die grinder. Then we will add Coastal Enterprises primer and final coats of paint and glazes. Stay tuned...

-dan

Tuesday, December 27, 2011

Another piece installed.

Today we made a quick trip to the Fox and Hounds to install the scroll on the stage. New Year's celebrations are only days away and all eyes will be on the stage during that event.

Peter & I bundled the finished piece and stopped it into the back of the pickup. Installations went quick and easy. We lifted it into place, centered and leveled it before drilling the holes and fastening it to the wall. Some carefully placed holes were drilled through the sign and faux cement bricks, before some long wood screws were popped into place. We were done as quick as that, finishing off another area of the pub. The weathered and textured scroll looks great with the bricks and the chainsaw carved wooden sculptures of the Fox and Hounds (done by others).

A good picture was impossible with the lighting present and the pocket camera I had handy as they come out either washed out or too dark. In person it looks fabulous and fits in perfectly with everything else.


Today we are having a somewhat lazy day, easing back into the work flow. Tomorrow we'll begin once again in earnest.

-dan

Saturday, December 24, 2011

Merry Christmas to ALL!

I just wanted to say thank you for supporting my efforts here on this blog. I always appreciate the comments, questions and suggestions. It was good to meet in person those I did at trade shows, workshops or elsewhere. I look forward to meeting more of you in the future.

As we wind things down for a few days of holidays I want to take this opportunity to wish each of you a Merry Christmas. I hope you get to spend some time with those you love, friends and family this season.
Once I've consumed my share of roast turkey and many other good things I'll be back in the shop doing my best to work it all off.  :)   

We have some very exciting things in store for the New Year, including some projects on the new four axis MultiCam.

I would like to especially thank the folks at Coastal Enterprises for helping to make this blog possible. 

Merry Christmas to ALL!

-dan

Tap dancing part two

The tap file was programed with tool speeds of 300 inches per minute horizontally, 150 inches per minute vertically. I've been doing it this way for years. The reality is however that unless your machine is capable of accelerating and decelerating quickly it will never reach these kinds of speeds on a file like this. I was pleased with my six year old MultiCam, especially after my tech tuned the parameters for the types of files we were running. But when I fired up the new 3000 series MultiCam I discovered just how much faster they have made the machine in the last years. This machine was dialed in from the factory for my kind of routing.


If you have trouble with the embedded video here's the tube link.

And before I knew it the file was run. Four taps in two sizes were ready for paint.


-dan

Tap dancing!

At the Fox and Hounds Pub there is a small area above the bar cooler door  that we left a couple of plastic pipes exposed. Our intent is to make them into some funky copper plumbing with a variety of taps. What their actual 'function' might be is mysterious but it will be an interesting vignette. I was going to use some real taps but decided instead to just route some from 30 lb Precision Board. It will save me time and I will also get exactly what I need for the job.

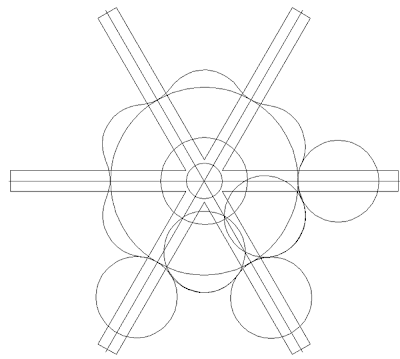
This is the kind of project I enjoy, figuring out how to make these complex shapes in EnRoute. I decided the taps would be six sided so I first created the spokes of the tap, some concentric circles and the smaller circles which I would use as guidelines for my final shape. I know there is a way to position the circles around the outside automatically but I couldn't remember so I did it by hnd. In=For this file total accuracy wasn't critical.

Then I used the drawing tool and drew a12 sided shape using the intersecting points of the smaller circles as my reference points. Then I used the line editing tool to bend them to the right shape using the small circles as reference. Then I could delete the circles.


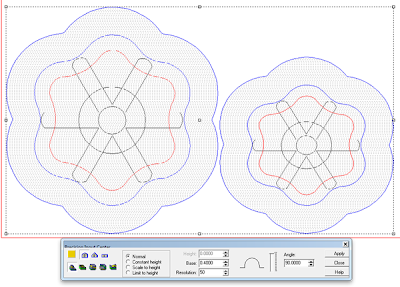
I used the offset tool to build the inside rim of the tap and shortened the spokes, and finally rounded their ends. I created one more offset to use as my zero height relief on which I would build the file. I like to route my small parts in this fashion as if I purposely leave an onion skin on the bottom the parts stay on the table securely.


The zero height background relief was the first step. then I added the rim of the tap as shown.


The spokes were next but built as a separate piece. They would be merged highest later.


Then I built the center section using the bevel tool but limiting the height to create a flat top and bevelled edge.


Then I modified this relief with a tapered hole in the center. It will guide me when I drill for a piece of doweling later. I could have drilled it with the router but I haven't decided the size yet.


At this point everything was merged (highest) with the zero height relief. Too pathing was easy on this piece. Since there isn't any real detail and I wanted the inside corners to have a slight radius I decided to route it with only one tool - a 3/8 ball nose bit. The taps are to be machined from 30 lb Precision Board so they could be done in one pass. I used an 80 % overlap.

In the next post I'll show the pics of the finished project and a short movie to show just how FAST the new MultiCam handled the task.

-dan

Friday, December 23, 2011

Hailey's first sign is done

Hailey was actually off today but at 8:00 am when I unlocked the shop doors she was there waiting. today was the day she would put the finishing touches to her first sign. It used all the tricks and techniques we have used for the Fox and Hounds project. She used the die grinder, sander, she sculpted, primed and painted. The there was a little twisting of wire for the knarly tree and layers of colored glaze to tone it all down, tie it together and make it look old.


Christmas morning Hailey will proudly give it away to her beloved grandparents. The sign is for the family cottage by the ocean. She has a right to be proud too for it is a nice looking sign. 

Well done!

-dan

Thursday, December 22, 2011

Ready for paint

This morning Hailey was at the shop bright and early, eager to work on her Christmas present. That was good for it meant I would be kept on schedule as well.  We decided I would work on mine and then she would follow, doing as much as possible on hers. I cleaned up the glue line between the front and back pieces with the die grinder, then added a little texture to the sides and back of the base.  She followed as soon as I was done. Then we mixed up a little Abracadabra Sculpting epoxy to fashion the bush along side of the lighthouse. We used an old tooth brush to add in the texture. The shingles were the next addition to the roof, also done with sculpting epoxy.

Then I took nine strands of tie wire and clamped them in my vice. I used a pair of pliers to twist them into a tree shape, branching out as we got towards the ends. Once the the was formed I drilled a hole in the rocks, filled it with sculpt and then pushed in my wire tree. Some twisted bits of sculpt formed some convincing roots around the base. As quick as that the sign was ready for paint.

Here's a pic of Hailey sculpting the roots of her tree...


And here's a shot of my sign ready to be primed and painted.


I'll post some more pictures later of it being painted.

-dan

Wednesday, December 21, 2011

Never too late

With Christmas mere days away now it is almost past time to get the last of the Christmas presents ready for the big day. Hailey, one of our employees reminded me today that I had promised to help her make a lighthouse name plate for someone on her Christmas list. This year I have my sister-in-law as my person to buy/make a gift for and I just hadn't got there yet. I know she loves lighthouses as well so this was a golden opportunity to kill two birds with a single stone.

I first built the vectors for the two different names. I would add the same lighthouse to both plaques as a second step. The lighthouse would be created using the rotate/extrude  tool. The lighthouse profile is simply wound around an axis to create a mesh.


Since meshes can't be tool pathed the next step was to create a flat, zero height relief and then merge the mesh to the relief. The menu is made live by selecting both the relief and the mesh. If you look close at the menu in the picture you will see I have not yet selected MERGE HIGHEST instead of add to relief.


After you do the merging the file will look like this. Then I selected the mesh (which is still there) and deleted it.


Then I opened the create slices menu to slice the flat relief from the lighthouse as shown below.


Slicing the rleif creates new slices without destroying or modifying the original file.


The lighthouse was then resized and places where I wanted it to be in relation to the rest of the sign. To create a faceted rock I created an irregular vector shape, then created a beveled relief using the limit to height command. This slices off the top nicely at a specified height.


The last relief I made was the name tags of he sign. I've shown this process many times before. If you wish to see it select 'Name plaques' from the previous posts. Before I did this step I also created a blank copy which would be flipped to form the back side of the plaques. The next step was to merge everything together onto a single background.


The two plaques were slightly different sizes. I then arranged and tool pathed the reliefs before sending them to the MultiCam. I let the machine do its job while we went out to supper to celebrate my grand daughter Phoebe's seventh birthday.


The files had been routed from 30 lb 1.5" thick Precision Board. I blew off the dust and using the PB Bond-240 one part glue I fastened and clamped the pieces together. By morning they will be plenty ready to finish up and paint - just in time for the big day.


Stay tuned for the finished pieces tomorrow.

-dan

Another piece is ready.

One of our many tasks today was to finish the paint on the scroll for he Fox & Hounds Pub stage.  It got a coat of Coastal Enterprises thick bodied primer and two base coats of paint yesterday. Today Hailey and I did the glaze this morning. Then Hailey did the two coats of dark brown on the lettering to complete the project. All of the paint was 100% acrylic latex.


One more piece of the puzzle is ready to install.

-dan

Tuesday, December 20, 2011

Texturing the scroll


Each time I post a routed scroll I get a couple of folks asking why I didn't program the file and router to do it all with the machine. While I certainly could and sometimes do the answer is I love the look of hand done sculpture. Residual tool marks and texture are best done by hand for it provides a look that is hard to duplicate by any other way. The second reason is I love to do it and sometimes I can do it faster by hand than I could program it and let the machine do the work.

The CNC does a fabulous job with the lettering, removing the bulk of material and shaping the pieces of the scroll. It was a simple matter to glue the ends to the center piece and then use my die grinder to add some simple texture While I was at it I roughed up the edges and added some small cracks to the scroll. Now we do the paint to make it look it's age.


It's going to look great on the brick wall at the back of the stage.

-dan

More finishing touches.

Today I headed back to the Fox and Hounds Pub to do a few more installs of projects we've made in the shop. The first was the Harold's Fine Wine sign. I needed my tallest step ladder to hang it in it's place on the London rooftop. It didn't tale long. Before I took the ladder away I snapped this picture. The colors of the sign fit in perfectly with the warm decor/


This is the angle the guests will view the sign as they look up to the rooftops above.


The next tasks was to do the special board. To fashion the 'boards' I plasma cut some rusty old sheet steel I had been saving for a special project. It was deeply pitted and very rusty but perfect for this project! For the blackboard portion I used some oil based blackboard paint purposely painted on with a ragged edge.


Three of the other barrels got blank sheets of rusty steel. These will be used for posters and information of coming events at the pub. The papers will be held to the steel with magnets.


As I worked quietly in the entry hallway I could hear guests delight and awe as they saw the newly renovated pub for the very first time. The reaction was the same each time the door opened. The patrons had left the real world outside to be instantly transported to the one we had carefully created. It made me smile.

-grampa dan

Sunday, December 18, 2011

Banner

 On the brick wall on the stage there will be a banner fasted to the wall. It has to be relatively thin to fit behind a wood carving (done by another artist). But I want the banner to have as much dimension as possible. To do this the middle will be fastened tight and the ends will be bowed out slightly with the scroll ends underneath. With the directed lighting it should look pretty good.

I first created the lettering vectors in Illustrator and imported the simple file to EnRoute.

I temporarily pulled the lettering out of the way, bent out the sides of my rectangle and then used the jigsaw tool to create the banner shape.


The lettering vectors were dropped down again into position on the scroll and given a 0.3" outline. I also used the drawing tool to quickly draw in a scroll end. This was duplicated and then flipped for the other side of the scroll.


The scroll ends will be routed as separate pieces so I pulled them off to the bottom.


The scroll was a simple flat relief that was 3/4" thick. The lettering outline was added to the base relief at 0.2" deep. Because the banner was a good sized piece and to be viewed from further way everything has to be a little bolder than normal. The scroll ends were flat reliefs 3/4" thick with the fold added at another 3/4" thick. I like to shape the scroll ends and fold by hand with the die grinder. I'll addd texture to the banner with the same tool. Both operations could be done with the router but I like the hand carved look. It will also tie the scroll to the hand carved wooden dogs better as well.


The beveled lettering was the last step. The shoulder height on the letters was 0.2" which again is a little higher than normal but appropriate for this application because of the size and viewing distance. 


I rearranged the pieces to best fit on the sheet of 30 lb 1.5" Precision Board, tool pathed the file and sent it off to the router.


Stay tuned for progress as I assemble and paint it in the coming days.

-dan