WELCOME!

It is hard to believe that it was almost ten years ago I witnessed a CNC router in action for the very first time. I was fascinated and simply had to have one! Although I had been in the creative end of the three dimensional sign business for most of my life I didn't really know what I would do with one of these machines - but I just knew it could do fantastic stuff.

Along with the CNC router I discovered the wonderful material called Precision Board and the glues, primers and other companion products they offer. Since then we have gone through many tons of the material using it in most signs and projects we tackle. This journal will chronicle our many adventures both past, present and future. I'll talk from the perspective of someone who pushes these products to the creative limit on a daily basis. I'll be adding to the stories two or three times each week. -dan

Tuesday, May 31, 2011

G Street sign

Jack Niemann's Black Forest Steakhouse needed a second sign for the handicapped entrance. He asked that this sign for the G Street Entrance be just as fancy as the first. We are making a dimensional sign mounted to the wall to identify the business, but he wanted a matching sign to hang over the G Street door.  First I created the vectors in Illustrator - a vector program I am very comfortable with.


I imported the vector file into PhotoShop and quickly created this illustration with my digital pen and drawing pad to show Jack what I had in mind. He gave instant approval.


Once the approval was in hand I imported the vectors into EnRoute and began the task of building the routing file. The crown moulding could have been done with a sweep two rails, but I decided to build each element separately and then merge them together at the end for maximum flexibility. The vectors were separated in groups. Using the jigsaw tool I cut out the shapes and then merged them together. I used the bevel relief tool to create a relief twice as wide as aI needed and then I merged (merge highest) a zero height relief (of the correct shape) to it to create the shape I needed.


The top and bottom flat portions of the crown were done in a similar fashion using the Jigsaw tool.


Then the egg shaped reliefs  were created and merged highest to the crown molding.


The balance of the reliefs were created and then merged together to form the sign. I duplicated and flipped one of the reliefs to make sure the two halves matched perfectly. Then I added the G to each side as a beveled letter.


The sign ended up being six pieces to be routed from 2" thick 30 lb Precision Board.


This morning before I left for our first day at the Fox & Hound's project I set the MultiCam in motion. 


-dan

Saturday, May 28, 2011

More samples

The fox routed up pretty quick. While that file was running on the MultiCam I opened the barrel head relief file. I had saved it as a stand alone file so I could use it for other things in the future.

When I was searching for the fox I had also located a pretty good blood hound STL file. I popped int onto the barrel head and merged it with the relief. It was ready for tool pathing in seconds.


As I created this blog it was running on the MultiCam, from 30 lb Precision Board.


This afternoon I'll whip on a couple coats of paint and glaze in preparation for the meeting on Monday.

-dan

Fox medallion

With the client approving all the artwork to date it was time to create a few samples. These would help double check all decisions and also ensure the contractor and trades were on the same page, knowing what to expect. First up was the Fox medallions which will be used in various sizes and in diverse locations.


I created the vectors in EnRoute and then used the jigsaw tool (pictured) to create the staves of the barrel.


The outer ring and the barrel top were the first relief created.  I used the render button to double check all was well.


Then I selected the outer staves of the barrel and built each separately, creating random heights with slight variations. Each was created as a separate relief.


Then the sandblasted wood grain bitmap (from my TEXTURE MAGIC COLLECTION) was imported and applied to the barrel top.

Since bitmaps can't yet be rotated inside EnRoute I selected all the pieces and rotated the reliefs to apply the textures to the barrel staves. At this point everything was merged together for form one relief.


To create the fox I used an STL file I found at www.3dmodelclub.com I've used their files before on some of my projects with good success. I resized it, positioned it and then merged it to the barrel top I had created previously.


Just like that it was ready to tool path and send off to the MultiCam. 

-dan

EUREKA! All bent out of shape!

I've had the idea in my head for better than a year but never got around to testing it out until today. A few weeks ago when I visited Coastal Enterprises' operation in California I asked Chuck Miller if it was possible. He affirmed my notion to heat Precision Board up and then bend it to conform to a curve shape. His advice was to let the heat soak in real good because the Precision Board is a good insulator and doesn't transfer it well.

Today when I went into the house for lunch I popped a good size scrap into the oven and turned the heat to 200 degrees. Fifteen minutes later I threw on a pair of oven mitts and pulled it out of the oven.  It easily bent and then hardened quickly without memory of it's original shape. As per Chuck's advice I didn't overdo it... but with a teeny bit more heat I suspect much more of a bend is possible.  Keep in mind my experiment was done with 30 lb Precision Board.


With our upcoming pub project I can now easily achieve what I need. I'll do the routing first and then heat the pieces up to bend them, clamping them over a buck to harden. The curved mantle pieces I designed are now possible with a minimum of material going to waste. I have a few more ideas in my brain as well that may benefit from this new found technique!

More fun is in the works...

-dan

Friday, May 27, 2011

Signs with a (true) story :)

Over the next couple of months we have some pretty exciting and imaginative signs to create for the pub project. These signs have a important jobs to do - different from most signs. They are eye candy - designed to look pretty on the walls. They advertise nothing, for the brands they represent are fictitious. Instead they tell the story of the business and building. The stories are what I like to call 'fictionalized history' - based on real events and told in a way that seems plausible - even believable.

The pub is British, with the timbers reportedly from an actual pub in Britain and more than a hundred years old. Research was the first order of business. Since the Pub is in Aldergrove, British Columbia I googled Aldergrove, England. Amazingly there were three Aldergroves listed for England. The Union Jacks and crown further strengthened the English connection. A fantastical fish has lived in my sketchbooks, left over from previous projects. The yellow fish is no guppy, but I love illiteration. It will sport a thin layer of pure gold and so became the gilded guppy - as real as the fictional bear it portrays.


My research next led me to British discoveries. The Galapogos Islands were discovered by a British sea captain who was blown off course in a fierce storm in 1593. It was the perfect excuse to create the Laughing (Galapogos) Tortoise Beer. This beer is painstakingly brewed and best enjoyed at a very SLOW pace.


The Master's Bugle Beer is another 'house brand'. The bugle of course was blown by the master of the fox hunt, the theme of the pub. Here the bugle is hung up - retired, the hunt now a thing of the past. The date is significant as well... my way of 'signing' the project. I was born in 1954 - 200 years after this beer brand was founded.


More signs are currently in the designing process. They, like these will tell other chapters in the story of the Fox & Hounds Pub. You can count on the fact they will be stories based on real, TRUE events.  :)

This is going to be a FUN project!

-dan

Concept for endless fun!


As we came off the MultiCam project a few months ago I knew the bar had been set pretty high for future projects. I wondered what might come along to top it. Last week that project did come along. It turns out the folks who own the Fox & Hounds Pub in Aldergrove, British Columbia were following this blog and the one on our own website http://imaginationcorporation.com/journal with the hopes of hiring us to work on their renovation and expansion. We had our first meeting here in my studio, then subsequent meetings at the pub. In between I've been very busy putting ideas down on paper. Today it's finally time to show them to the world as we begin one of the most exciting projects of my career, thus far.

The challenge was formidable. The original Fox & hounds pub had been operating for decades. The heavy post & beam structure of the building dates back to England, more than a century ago. All that stays intact, while the pub and restaurant addition more than doubles it size. The challenge was to modernize, refurbish, enhance and expand that original charm, making it into a world class establishment. It will be done while the original part stays open for business. And we have three months to do the project.

Construction is well underway, with the new addition now almost to lockup stage. Since I had no input to this point the further challenge was to work with everything already planned and currently in construction. All the 'restrictions' would force me to be creative and I was up for the task!

The new logo/signage was the first task. It would set the tone. A little research was necessary. I discovered that fox hunting was a century old sport. We wanted to play homage to those deep traditions. But I also quickly became aware that many think the sport somewhat cruel and would like to see it abolished. I had to tread carefully. After discussions with the owner we decided a lighthearted approach was the order of the day. The hounds in our story would be somewhat laid back, almost to the point of being lazy, more interested in taking a nap than chasing a fox. The fox on the other hand was mischievous and enjoyed teasing the canines. This would set the tone of our tale.

The logo was designed with both CNC routing and hand sculpting in mind. Since it will be featured a number of times both inside and outside the building it needed to be relatively easy to reproduce. It will be both traditional and timeless.


The new addition will blend in seamlessly with the old. Our job will be to make the new construction look like it has been there for two hundred years. Much of our job will be to warp, bend and age things to achieve that look. It's going to be a fun challenge!


Once through the entry there will be no doubt you have arrived in a magical place. No straight lines here. Every square inch will get the treatment. A sign is not a flat, square board, but rather encompasses all you see and feel. We will use every trick we can muster with the MultiCam taking the grunt out of the task. Modern materials like Precision Board will be used to create the old world look we are after. 


Our client loved my lectern in my shop and we will be building a new version to act as the hostess station in the entry. But the theme will be worked into this and every piece of course. A fox will be hiding in the hollow trunk, ever vigilant for the hounds it eludes.


The new dining room will be like none other. Two large, knarly trees flank the entrance and inside two more giant old weathered specimens bookend the room to create a unique ambiance. A charming fireplace warms the environment nicely. And the ceiling will curve gently to highlight the scene. The mantel will be routed from Precision Board and feature the tagline "who let the dog's out?" - a humorous reference to the hounds that seek the fox of course. Up in the tangle of branches are many more animals, seeking refuge from the dogs as well.


In the pub portion we are refurbishing the old Tudor, post and beam woodwork. The plaster will receive an aging patina to warm things up.  The fireplace will be refaced entirely to reflect it's old world heritage. The raised ceiling will be reworked to feature a London skyline, complete with slate roofs and many wonderful character chimneys which they are famous for. 


Every detail, piece of trim and feature will help tell the story and also brand the establishment. Corner blocks on the doors will feature the fox. Signs throughout will both inform and entertain.


I've already sourced a wonderful STL file for routing a fox head. This will be incorporated into signage and the woodwork and cabinetry through the place, adapted and sized to each location as needed. I am confident that EnRoute will make this and all the other tasks easy and quick to realize. 


There are of course hundreds of other details and drawings to come in this project. There will be many, many more posts to come.  Stay tuned...

-dan

Sunday, May 22, 2011

CHALLENGE STILL GOING!

Eighteen months ago I issued a CHALLENGE to my sign making friends. The CHALLENGE was for everyone to create one sign or project that was for themselves. It was to be  sample for their shops. The sign was to be of the type they would make if cost was no object - the type of sign they dreamed of making. In our shop we upped the ante, creating one sign each month instead. These signs worked beyond my wildest dream for us. They've been honored with many international awards, been featured in articles and most importantly brought in the type of work we WANT to do.

Today I received word the CHALLENGE is still going. The CHALLENGE, along with pictures of our projects is being published one more time - in Russian this time. A six page feature is to be published in the biggest Ukrainian Sign Magazine.

It is my sincere hope some sign makers there take up my challenge for themselves!


-dan

Thursday, May 19, 2011

Bitmap MAGIC!

More than five years ago, just after I learned how to use bitmaps to create textures in EnRoute I was eager to see just what I could do with them. I was also looking everywhere I could to find inspiration. I needed to know what worked and what didn't.  One source of inspiration was my collection of old National Geographic magazines. I would san in the old photos and see what the images would do in the program. Eventually I figured out what worked the best and how to tweak and adjust them to work even better.

On one such search I found a picture of a fossilized fish. I remember getting excited to give it a try. I scanned the picture and pulled it into Photoshop. I adjusted the contrast and added a few bits. Then I created a quick vector file in Illustrator and drew up the vectors for the circles and lettering around the edge. I imported the files into EnRoute and then set to work. 

The basic file was simple. The circle was made into a relief. Borders and lettering were added as a modification to the relief. Then the magic was about to happen with the bitmaps.


The fish was added first. The black did nothing while the white of the photograph was raised by the 0.15" I specified. Grays were in between. I layered a second bitmap called splotches over the entire file to add a little more texture. This was done very subtly with a numeric of only 0.05. It didn't need much to make it effective.


What amazed me at this early stage of the game was just how fast the process was from start to finish. From the time I found the image, edited it, built the file, sent it to the router, ran the file, painted it and mounted it to my wall was just under an hour. The paint was still wet of course but the file was done and amazingly so!


It was pure MAGIC!

-dan

Tuesday, May 17, 2011

Building a file for a four axis machine

Like the files we currently build in EnRoute for our three axis MultiCam, I am discovering there are no end to solutions of how it will be done for the four axis router when we get it next month. The folks at EnRoute are working on the software to do the task. I've seen it done but have yet to try the software for myself. Many of the four axis tasks will build on the capabilities of the current software. In many instances the files can be build as they are now and then the reliefs simply wrapped to form the fourth axis files. A thorough understanding of the current software will give us a leg up on what is to follow.

In the last days I have been searching the net to find out just what folks are doing and how they are doing it. What I have found out is many are using '3D clipart' and simply modifying the files to route in the round. It's not that much different than what is happening in the 3 axis world of routing. But I want to do a whole lot more than that. I want to build anything I can dream up. Even with the very limited things I have thought and dreamed up so far I believe I will be able to use EnRoute to achieve it. And since I managed to do many things that many told me would be difficult or impossible to do on a three axis machine - imagine what will be possible with the four axis being built now.

Last night as I sipped on a Coke and did some sketching It occurred to me how difficult something like a Coke bottle would be with a three axis router. Difficult but not impossible. But with a four axis setup it suddenly became relatively easy. As usual it is as simple as visualizing the various bits and how to eventually combine them for the finished result. Let me take you through the process...

It only took a few seconds to locate a picture of the Coke bottle I wanted. It was the old style with embossed lettering. I did a vector trace in a few seconds more. The Coca Cola logo was also traced and made into a vector in seconds. EnRoute is very good at that task.


Sweep to rails is a task I am only moderately familiar with. I quickly learned that the rails need to be vertical - unless it was some other operator malfunction I was performing. Once I had the rails turned the right way it worked the first time. It looked like a flattened Coke bottle already. This was merged with a zero height relief.


Now it was time to add the flutes. I lined the Coke bottle picture up with the relief and drew two appropriately sized shapes... 


These were then duplicated across the bottle.  I counted the number of flutes on a real bottle and then sized and spaced then accordingly. I then modified my relief to form very subtle flutes across the bottle.


The lettering was next. Unfortunately I neglected to grab a screen capture of the vectors. I squished them together to deform them horizontally. The thing to remember is that as we wrap around the center axis the thicker part of the bottle will stretch out the surface (by virtue of its distance from the center axis), bringing the lettering back to it's proper shape.


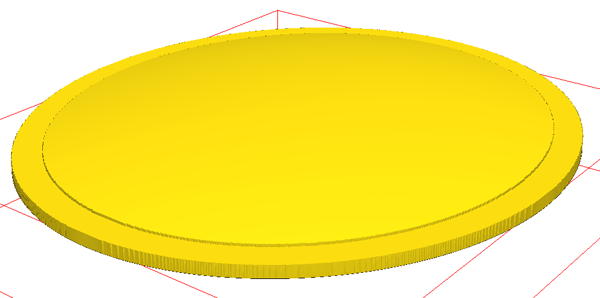
The bottle cap was next. O created a zero height relief and then modified it with the oval shapes. I made then 1" tall and domed steeply. The parts off of the zero height relief were cut off sharply of course.


I checked the side view and saw they needed tapering at the top. 


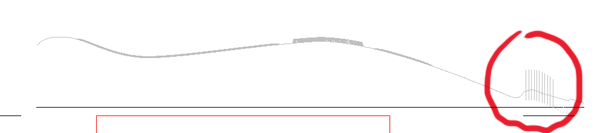
I chose to modify them with a fade bitmap It worked out to be 0.6" that worked to blend them into the top of the bottle cap.

The next shot shows how the blend bitmap affected the ridges of the bottle cap. 


I then resized and positioned the file before merging it with the original relief. Except for wrapping it around the center axis the file was complete.


Since I do not yet have the software for that function we will have to wait to see how I did in creating the file... but I am confident that it will work as planned.  Stay tuned for the final result.

-dan