WELCOME!

It is hard to believe that it was almost ten years ago I witnessed a CNC router in action for the very first time. I was fascinated and simply had to have one! Although I had been in the creative end of the three dimensional sign business for most of my life I didn't really know what I would do with one of these machines - but I just knew it could do fantastic stuff.

Along with the CNC router I discovered the wonderful material called Precision Board and the glues, primers and other companion products they offer. Since then we have gone through many tons of the material using it in most signs and projects we tackle. This journal will chronicle our many adventures both past, present and future. I'll talk from the perspective of someone who pushes these products to the creative limit on a daily basis. I'll be adding to the stories two or three times each week. -dan

Tuesday, August 31, 2010

Day two and three...

With the heavy lifting out of the way I could start to do the finer details. I wanted to do a section of the wall to a more finished state to make sure I liked it. These projects are done by eye and not so much from plans. I used Coastal Enterprises FSC 88-WB primer to introduce some texture to the large pipes and on the wall (like I had done on the beams). It was applied with a 1.5" brush in a random pattern. It was a tedious job but well worth the effort because of the subtle texture generated. I also tested the distance between rivets on the wainscoting. The Rapid Texture generated in EnRoute looked fabulous on the wall in full scale as did the small 'M' medallion which will repeat in every panel around the room.


The large sono tubes installed like a charm and immediately gave scale to the project. The finished project will be very hard to photograph as you simply can'y get back far enough to include more than three ribs. The room is best experienced in person. It will look far better when the curved ceiling is in place.


Day three saw the installation of the sono tube on the second side. I installed all the baseboards and got a good start on the wainscoting and more paint. Today I spent the day seismically anchoring the beams in place - five steel braces and three structural cables for each beam as per the engineer's instructions. There are no worries about these beams coming down! Then I taped off and masked the work I had done in preparation for the fellow who has to spray everything above with a fire proof flocking material as per the fire code. 


I'll be back on the project on Friday and hopefully make good progress on the wainscoting and other details. In the meantime it's time to do some more designing of routing files and then keep the MultiCam busy.

-dan

Friday, August 27, 2010

Day one of the build...

Every project begins with a before picture. This is what was there as we arrived. The painter was pulling his hoses out of the room as we walked in... the paint still wet on the walls. The ladder covers a large hole in the floor, cut to bring the electrical and electronic hookups to the table. It will be filled in later in the week we are told. In the left corner is a box built to go around a pipe - a surprise to us but easily fixed.  The ceiling beams are three inches lower than the plans indicated... another easy fix. I have no doubt we'll find a few more surprises as we go.


Peter and I first measured things out, then looked for the backing which was put in place to fasten our beams to. Once our layout was done it was time to start fastening in the uprights... after I cut two and a half inches off the bottoms to account for the lower beams. Then we used a drywall lifter to hoist the beams into position. They weren't made of steel but they were almost that heavy! 


Since the air conditioning was not yet functional and the electrical far from complete we operated in warm temps and temporary lighting. Progress was relatively quick and smoother than I expected - especially for a first day on the job. We had enough time at the end of the day to install the end base board, one piece of wainscoting and the submarine door (white board).  I couldn't resist taking a few minutes more to install the 'M' medallions on the beams. They were made from 30 lb Precision Board.


Because of the ease of designing the files in EnRoute and the precision of the cutting on the MultiCam everything fit perfectly as it should.  I was more than pleased when it was quitting time. The room had changed dramatically in only a few hours. The heavy beams went up without incident. And the heavy lifting is done for this room. Tomorrow I'll be doing lots of cutting and fitting, painstaking work, with lots of details to install. The room is going to look as cool as anything I dreamed!

-dan

Wednesday, August 25, 2010

First load out the door!

This week has been fun. Our son, Peter is on a break from university and he's helping out in the shop. Peter worked for us for more than 14 years. Awesomely talented he can do pretty much anything he puts his mind to. He decided to become an animator about 10 years ago and did well. Now he's changing gears again and wants to work with high school kids. To achieve this goal he is studying to become a math teach and is just finishing his third year of studies. Although much has changed in the ten years since Peter went on to other things he picked up the tools and it was like he never left. It's almost scary how much we think and work alike. There's been lots of laughs this past week and lots of work done too!


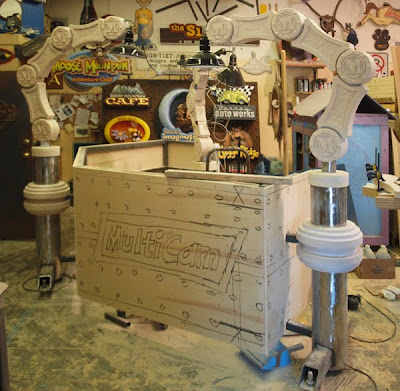
Although it looks like there is lots to do the receptionist's desk is coming along nicely. Both lamps are now ready for paint and many other pieces are cut and ready for assembly.


The end table/lamp for the waiting area is also well under way. The steel work is now finished and much of the assembly done. The cabinet folks will do the twin table tops to match the desk. It's a very fun piece that will add life to the corner of the room.


Today was also the day the first load of pieces were strapped to the trailer and we headed down the freeway to the job site. On the way we picked up the table top which looks fabulous! I figured the safest place to haul it was on the top of the table base. We arrived without incident.


Bright and early tomorrow we'll load up the trailer one more time with a whole bunch more pieces. In the afternoon we get possession of the boardroom at long last. Friday we'll be starting the assembly process...  I can hardly wait!!!

-dan

Monday, August 23, 2010

Happy day!

We made good progress today but rather than show that I wanted to share another photo which means a lot to me. My five year old grand daughter Phoebe often comes to my shop to 'help' me.  She's been a regular since she was days old.


I had saved a large bin of cutouts from routing the beams just for her. I had placed them near the door of her big blue and purple playhouse which lives in my shop. She discovered the big box last night, went to the tool box and got a felt pen, then disappeared for a while inside her house. She came out with a large stack of happy faces drawn on the circle pieces. She asked me to pick a favorite which she then placed on the beam 'for decoration.' Although it won't stay there permanently I do love it. I'll have to convince her that I don't want it to go away from my shop and instead we'll screw it to the wall to smile on me and all who come to my shop for years to come. 


The walls of my shop and studio have many such treasures dating back to when my kids were small. They make me smile.

-grampa dan

Sunday, August 22, 2010

Still more pieces!

With each piece I design and build it seems there are ten more to do. But this project is all about detail. Branding the facility will be plentiful but carefully worked into the design so it does not appear forced or out of place. The 'M' motif, standing for MultiCam of course, will appear everywhere. Today I designed and created the 'M' medallions for the beams. They sport a weathered texture and rivets of course to work them into the theme. 


The file was created in EnRoute in minutes, then duplicated and positioned for routing. It uses a bitmap texture called splotches. Once routed it looks amazingly like weathered metal. The rust finish will complete the story. The medallions were tool pathed with a 3/8" ball nose rough pass and a 1/8" tapered bit at a 75% overlap for the final pass. They took less than an hour each to complete. I routed them from inch and a half thick, 30 lb Precision Board.


I couldn't resist priming one piece up while the others were still in production and then test fitting it on the beams. It made me smile for this was a critical part of the design since I first imagined and drew it over a year previous. The project is no longer just a dream.


The exciting day will be when I can assemble all the pieces permanently at long last.

Stay tuned...

-dan

Texturing the beams

Once glued is dry I use my die grinder to give the beams a quick once over. Where everyone else would break out their sander and spend hours trying to get everything perfectly smooth I'm going in the opposite direction... and adding texture. I get rid of the glue seams and any other imperfections at the same time. I spent about twenty minutes per beam to do the task.


In the next shot I still have to fill the screw holes and add a bead of caulking on the inside corners to round them out - just a little. 


Then I use Coastal Enterprises high build, water based primer to add one last layer of texture. To do this I use a one inch brush and random strokes, leaving globs of primer everywhere. Once we add the rust paint it will all make sense.


The cabinet guy let me know late Friday that the top is done for the boardroom table. Other pieces are stacked up around the shop and on the job site. It will only be a few more days until this whole thing starts to come together... 

I can hardly wait!

-dan

Friday, August 20, 2010

One more set of pieces...

Pieces of the MultiCam project continue to be cut, assembled and stacked around the shop. Today the top of the ribs/arches for the boardroom were glued together. Each rib is made from 14 pieces and all have to fit together perfectly. With the precision of the MultiCam that is no problem - a far cry from my jigsaw days. 

Over the next few days I'll fasten the last pieces on, add the hand finished details and prime them in preparation for transport and final assembly on site. With the pieces now surrounding me every day I am anxious to see it all together at long last! It's going to look better than the concept by far!

Hopefully by the end of next week it will all become real...

-dan

Monday, August 16, 2010

VIDEO!


I've been getting lots of requests for video lately as some things simply don't translate well in the written word. My good friend Donna came over to my shop today with her little camera and we did a quick video session. Then I opened my iMac movie editor for the first time ever and gave it a whirl. I'm learning lots and it will get better with time, but here goes the first one in regard to the LED's for this project.


The LED's I'm using are called VIRGOlites from Heico Lighting www.heicolighting.com. They were purchased online from their distributor   www.futureelectronics.com  

-dan

Sunday, August 15, 2010

More progress...

I couldn't resist one more shot tonight as I put a few more pieces together late today. There are still plenty more details to come but it is coming together quickly now. After tomorrow it should be pretty much down to final paint and assembly. 


As the many, many pieces are built for the board room the excitement builds both here in my shop and for everyone watching the process.  I can hardly wait to get onto the worksite and begin putting it all together. 

-dan 

I love it when a plan comes together!

While the MultiCam continues to churn out the last of the pieces for this sign/display piece I continue to make progress on the sub itself. The outside molding is well underway and it is now looking more like a submarine all the time - or at least how I would build a sub. At each stage of the construction I like to assemble all the pieces and see how they are working in relation to the whole project. Since the inside of the sub is so visual I decided to keep more glass clear. The side fins will now be to the rear portion of the sub. The electric blue LED lighting does exactly as I envisioned with the lighting being well hidden. The warm reds play against the cool blues in a dramatic fashion. 


I can hardly wait to continue with the project but first I have to do some organizing in the shop. It's getting hard to get from one end to the other with all the projects on the go. Stay tuned for more progress soon...

-dan

Saturday, August 14, 2010

We have ignition...

This morning I delivered and installed a sign. The temps are well above what we normally enjoy in these parts and I got plenty warm in the sunshine. I decided I would reward myself by working in the cool shop and finish the interior of the submarine. I was anxious for the LED lights had arrived yesterday - days ahead of my planned schedule. I used sculpting epoxy to create the details. For the little rivets around the front and rear bulkheads I used little googly eyes from a dollar store. They were pressed into the wet primer. With the warm temps and a good fan the primer dried pretty fast - as did the coats of gold colored paint.


Then it was time for the moment of truth... how would it look with the LED's, new territory for me. The LED's I am using are contact-less miniature units. I just slide them over the wire and position them as needed. I can use as many or as few as I need. Each unit has two bright bulbs and I used three on this project... one underneath, one behind the seat and one behind the gages in the dash. When I fired them up I was DELIGHTED!!!!


I'll let things cure good and hard overnight and then begin final assembly tomorrow...  

-dan

Thursday, August 12, 2010

Amazing stuff!

It's amazing! I'm not talking about the stuff I create, but rather the tools I get to use. I've met many of the folks who make MultiCam routers. The brilliant fellows who wrote the EnRoute program are good friends of mine. They've done their best to explain how these things work. And yet each time I fire up my CNC router I find myself amazed as it jigs and jogs through Precision Board leaving a perfect part behind each and every time. Today the MultiCam is whittling the last of the sub parts as I type. It runs just fine - I don't need to watch it. It will run all day on various projects while I do other things.

Last night I created the files for the last bits of the submarine. I did it all in EnRoute starting by tracing the shapes over a digital photograph. I did a screen capture of the vectors when I was done.


I used the profile I had created with vectors to revolve to create the shapes on the top hatch and the nose cone. I like to use meshes rather than simply add to a relief as they can be manipulated (which I didn't have to do this time) 


Once I was happy I created two zero reliefs and merged the meshes to them. These were higher than my 1" substrate but I would simply slice them later. In EnRoute 4 pro it is a simple operation - so simple even I can easily handle it.
To do a project like this I like to build each shape individually and then merge them when I'm happy. The hinge for the rudder was a simple rectangle domed at a 90 degree angle. I then created four zero height rectangles and merged lowest to get rid of the bits I didn't want.


I built each piece, sliced and then arranged the cones then merged them to a large zero height relief. In a few minutes I had all the pieces I needed for the sub. Before I applied the tool paths I checked a top view and the 3D view. Everything looked like it should. Then I sent them to the MultiCam for production. 

Then of course as I kicked the machine in gear I couldn't resist watching for a bit as it did the magic thing.... all without any help from me of course... 


I'm still amazed in Yarrow...

-dan

Wednesday, August 11, 2010

Sub in a bottle...

As I travelled last week I built this thing in my head over and over, each time getting more detailed than the last. When it came time to actually begin doing the work I knew pretty much what I wanted. The file was created entirely in EnRoute. The program works equally well no matter what the scale. The bulk of it was vectors although I did throw a bitmap texture on the bulkhead behind the seat. The cone piece was sliced to fit inside the 1" material. I carefully left spots for the LED lighting modules which I ordered today.

The pieces were roughed out of 30 lb Precision Board with a 3/8" ball nose bit on the MultiCam, then followed with a fine pass and my 1/8" ball nose bit. The files were relatively small and went very quickly. 


Before I cleaned the edges I test fit everything. I knew it was accurate, but I wanted to see if the ideas which I had in my head proved practical in real life. Things were coming together pretty quickly and looking like I had dreamed them.


Once the edges were cleaned up and the dust blown off I glued everything up with a quick set epoxy. Then it was time for the moment of truth...  would it all fit inside the glass bowl? I needn't have worried for everything fit perfectly - just as I had planned. Model making has never been so much fun!


Now it's time to craft and install all the detail as well as paint the inner pieces. With the LED's on the way I should have just enough time to get it finished before the next step. Stay tuned...

-dan

Monday, August 9, 2010

How to build a submersible model...

Many years ago, back when I first got a lathe I decided to build a model of a submersible vessel. I started with a fishing float I had found. I used wood, paper, paint, bits of wire and a bunch of other things to craft it. The rivets were those little plastic, googly eyes I found in a craft store. Its been on my shelf ever since. The model has inspired a number of projects through the years for theme parks.


When I got our MultiCam router, one of the first projects I tackled was a submarine model. Its a half model and hangs in our shop bathroom. I explored the limits of what I was capable of at the time. 


Now with the debut of this new project and a submarine theme room it is time to explore the subject one more time. Only this time there are far fewer limitations. It's time for some real fun!As always I started with some sketches. These were done at 30,000 feet as I flew to Illinois last week. The first is the entire sign as it will be seen from the front. I've noted where we will insert some LED's and sculpt some sea life. We'll be going all out this time.


The sub itself will be somewhat similar to the previous models. But this time the glass will be kept clear and I will sculpt a full interior which will be lit for full effect. I established the proportions with this sketch.


The interior, like the rest of the submarine will be  combination of CNC work and a little hand sculpting.


I scratched my head for a little bit as to how best sculpt the project, specifically the interior. I decided I would first buy a fishbowl and then insert the interior into it (after it was finished). The sub would then be formed around the bowl. After some searching I located a suitable glass bowl. I've measured things up carefully and next I will build the files I need to do the routing. I'll be covering that task in the next installments.


Stay tuned...

-dan

Danville mural project a SUCCESS!

Danville, Illinois and the gathering of Wall Dogs is now but a fun memory - but what a memory! After getting up at 4:00 am local time, and traveling all day we jumped right into the process of creating a mural or rather 15 massive murals on the walls. Each wall would feature some aspect of the local history. My project was but only one that was to be finished only three days later. More than 160 artists had gathered from as far away as New Zealand to make it so. We projected the murals and traced the designs onto the walls the night I arrived. After a very long day I was glad to get some sleep when the light faded.

Thursday morning dawned bright and warm. Since my wall faced south and the temperatures was in the mid 90's (with humidity to match) I slathered on the sunscreen and set to work with my friends. Volunteers from Danville made sure we had everything we needed. The work progressed quickly and by nightfall of the first day the interurban mural was two thirds complete. I slept good that night! On Friday, thanks to awesome media coverage, the townspeople came out in force. Magic was happening before their eyes - all around town. My crew started peeling off to help other artists not quite as far along. We managed to make the painting last until suppertime before I declared the mural done. It measured about 24 feet wide by 18 feet tall.


The next day I got to relax as I helped a good friend of mine from Edmonton, Alberta who was project leader on another mural. The pressure was off as I only had to do what he asked - no real thinking involved. By Sunday all the murals were done from one end of town to the other and we bade goodbye - until the next time...

I arrived home very early this morning. My email box is full as is my answering machine. It was time to hit the ground running... back to the projects at hand!

-dan

Tuesday, August 3, 2010

Flying off to Danville...


Tomorrow morning, bright and early I'm off to Danville, Illinois to lead one of fifteen murals we will accomplish over the next four and a half days. The shop is unusually quiet and will stay so until my return on Monday. I decided to post a picture of the completed milepost sign which I posted some progress shots of a while back. 
While I'm gone and on the plane going and coming I'll be busy working on ideas for current projects and projects not yet dreamed. They say a change is as good as a rest. Even though we'll be working hard and for long hours I always come away from these type of events with my head chock full of new ideas and inspiration. I have no doubt this trip will be no exception.

Se you in a few days...

-dan

White board that is anything but plain white

The MultiCam board room needed a white board to facilitate the training that will happen there. No ordinary white board would do. It stumped me for a while but as always an idea eventually came to mind. I would hide it behind a door. A little research on the web gave me the images to start with. I scribbled up an idea in my sketchbook first. The door would be simple with plenty of rivets of course. 
Then I created the vector file with the drawing tools in EnRoute. It only took a couple of minutes. Just after I took this screen capture I decided to add one more small detail...  'Yarrow Shipyard' would be my subtle way of signing the room.
The door was cut from 1.5" thick 30 lb Precision Board. A second layer was cut from 3/4" MDF to add strength. I also welded up a hinged steel bracket from two pieces of angle iron to make sure the door stays attached to the frame forever. A sheet of 3/4" plywood is screwed and glued to the back of the door frame for firm attachment to the wall. 
There is still plenty of details to come, texture of course, lots of rivets, the handle, perhaps some barnacles and the rust finish to blend it into the rest of the room. One more detail is now well underway. As I worked on the whiteboard I was thinking of the primary eye candy for the room. I think I have it all worked out in my head and on paper. But I'll leave that for the next installment...

-dan

Rust patina now done.

The table base has now sat outside for a couple of days and the rust patina has evened out a lot. The dark blotches are now gone. It looks like we dragged it up from the bottom of the sea after being submerged for many years - just as we planned.
The surface is mottled and a little textured. The barnacles look like they belong. I'll be painting the starfish yet but will wait a few more days for everything to cure properly.
While the rust is forming on this piece we've been busy in the shop on other pieces for this project. Stay tuned...
-dan